Thursday, December 30, 2010

Baking 101: Always pre-heat the oven


My sister was having some problems with misshapen baked goods herself. She had baked a bunch of chocolate chip cookies to take to school and posted up a picture on facebook for everyone to see. The thing is, these cookies could have easily been mistaken for chicken nuggets, as that is exactly what they looked like (Conveniently, all photographic evidence has been destroyed).


Though they were apparently still quite delicious, I do believe that cookies should look like cookies and we set out to resolve her conundrum. I was eager to bake a batch from scratch but we had some Chocolate chip macadamia nut (with milk chocolate, not white, interestingly enough) frozen dough sitting around from a fundraiser bake sale and she insisted that we bake those. The case of the chicken nuggets was easily solved when I realised that my sister was not a believer in the school of oven pre-heating. I convinced her to do it my way and as expected, our cookies came out looking and tasting as cookies should: crispy on the edges and chewy in the middle. Moral of the story: Always preheat the oven!

Tuesday, December 28, 2010

Christmas Morning Banana Muffins


Sometimes you have to trust your instincts. In this case, when something doesn’t look like muffin batter, it probably isn’t muffin batter. We had had some extra sour cream leftover from chilli night and I had this old recipe sitting around on my computer (since October 2009, apparently) that I had been meaning to try out for ages. So it seemed rather fitting that I bake some sour cream banana muffins for Christmas morning breakfast.

I followed the instructions and measurements to a tee fromhere (except halving the sugar and reducing the sour cream to 2/3 cup since it was all we had left, of course) but or some reason my ‘batter’ was more like a dough. In fact, my just awoken mother asked me why I baking mashed potatoes… That, is what my ‘batter’ looked like. Despite this, I just optimistically thought that everything would sort itself out in the oven. It did not. My ‘muffins’, if you could call them that, remained identical in shape as when I put them in the oven. As oblong clumps of dough. 
As upsetting as it was to know that the centrepiece of Christmas breakfast was an utter failure, this cloud came with a silver lining. I would have been more than happy to toss this recipe into the ‘do not attempt ever again’ pile, that is, if they didn’t taste so darn amazing. They had just enough banana flavour, and the full fat sour cream added great richness to them. So if I just ignored the fact that they were supposed to be muffins, I had actually made quite impressive dense scone biscuit type things…
Maybe the banana wasn’t ripe enough (it was of prime eating, but not baking, ripeness), or the extra sour cream and sugar would have made a difference. But even with half the prescribed amount of sugar as the original recipe, these were more than sufficiently sweet. The original recipe actually recommends dipping the muffin tops into melted butter and then some cinnamon sugar, now that would have been an overload.
I do want to attempt these again, but with water added until I get a batter, not a dough. They have more than enough flavour and sweetness so that water wouldn’t dilute the taste down too much, so that’s not a worry. Guess we’ll have to wait until I have more sour cream sticking around to give these a second try!
Sour Cream Banana Muffins
Yield: 15 muffins
  • 2 cups all-purpose flour
  • 2 teaspoon baking powder
  • 1/2 teaspoon salt
  • 1/2 cup sugar
  • 1 egg
  • 1/4 cup melted unsalted butter
  • 2/3 cup sour cream (I used full fat, but that’s definitely not necessary)
  • 1 large mashed banana
  • 1 teaspoon vanilla extract
  • Enough water to get a batter consistency
  1. Preheat oven to 350 degrees F. Grease a 12-cup muffin tin or line it with paper baking cups.
  2. In a large bowl, whisk flour, baking powder, and salt together. Set aside.
  3. In a separate bowl, lightly whisk egg and add sugar. Continue whisking until thick. Add the melted butter in two or three additions. Whisk in the sour cream in two additions, followed by the mashed banana. Add the vanilla.
  4. Make a well in the center of the dry ingredients and add the wet ingredients; gently fold with a spatula, being careful not to overmix.
  5. Add enough water to reach ‘batter’ consistency
  6. Divide the batter between the muffin cups. Bake for 25-30 minutes, or until a cake tester comes out clean and the tops are lightly golden.
  7.  Let cool completely on a rack
Per muffin:
132 calories | 8.2g sugar | 4.9g fat

Sunday, December 26, 2010

Christmas Desserts: Mint Brownies and Peanut Butter Popcorn


Hours before Christmas dinner, I still didn’t have any desserts in mind and was in need of some serious inspiration. I needed something that was sugary enough for the kids while still palatable to the adults and thought that another trip down peppermint-chocolate lane would be a good idea since my candycane cookies were so popular before (see previous post). So mint brownies it was!

A brief search on the omniscient allrecipes produced a recipe with an aesthetically pleasing photo of brownies with mint frosting (Yes, I judge recipes based on their photos. Books should have nice covers). Some reviewers of the recipe said that the brownie itself wasn’t very good so I picked out another recipe for plain old brownies. I had to change the measurements a bit for both recipes as I was only planning on making a 9X9” pan’s worth since there were going to be other desserts. I set the timer for the original baking time and planned that I would just take them out early since I was making a smaller amount…but then I got distracted. So they were a little overbaked but my sister and cousin both said that it wasn’t noticeable as anything with chocolate = good. My aunt also commented that they weren’t overly sweet so I guess I was successful at that!
 
These turned out great and were super quick to make, especially since some of the prep time (chilling in the fridge) was done while we were enjoying our turkey :).
 
To add to the dessert fare, I also made some peanut butter marshmallow coated popcorn as directed by this recipe, which was sticky and wonderful (and thoroughly welcomed by my other cousin, who apparently doesn’t like mint).
Mint Brownies:
Yield: 48
Brownie:
  • 1 1/4 cups All-purpose flour
  • 3/4 cup sugar
  • 1/3 cup cocoa
  • 2/3 cup vegetable oil
  • 3/4 tsp Vanilla extract
  • 1/2 tsp salt
  • 3 eggs
Mint frosting and chocolate coating:
  • 1 and 1/3 cup confectioner’s sugar (a.k.a. Icing sugar)
  • 2/3 cup semi-sweet chocolate chips
  • 3/4 tsp peppermint extract
  • A few drops green food colouring
  • 2 tablespoons water (may be more or less, use as needed to attain correct consistency)
  • 1/3 cup + 3 tablespoons butter (separate)
  1. Preset oven to 350F
  2. Mix flour, sugar, oil, cocoa, eggs, salt and vanilla until smooth
  3. Pour into a greased 9x9” pan and bake for 20 minutes, or until a toothpick comes out clean from the centre
  4. Allow to cool in pan completely
  5. Cream a few drops of green food colouring, 1/3 cup butter, mint extract and icing sugar. Add water until a frosting consistency is formed and spread onto cooled brownie
  6. Melt remaining butter with chocolate chips in the microwave (30 sec should be enough)
  7. Allow to cool a bit and spread overtop mint frosting
  8. Chill in the fridge until chocolate is set
Per brownie:
104 calories | 4.7g sugar | 5.9g fat
Peanut Butter Popcorn
Yield: 20-ish servings or 1 cookie sheet full
  • 1 bag popped plain microwave popcorn
  • 1/4 cup peanut butter
  • 10 large marshmallows
  • 1/4 margarine (I used the ‘light’ kind)
  • 1/4 cup brown sugar
  • 2 tablespoons semisweet chocolate chips
  1. Pop popcorn as directed
  2. Mix all remaining ingredients in a large bowl (except chocolate chips) and microwave until marshmallows are melted (~45 sec).
  3. Stir and slowly add in popcorn, mix until evenly coated
  4. Pour onto baking sheet covered in wax paper
  5. Place chocolate chips into small ziploc bag and microwave until melted (~30sec)
  6. Snip off corner of bag and drizzle chocolate onto popcorn
  7. Allow to set and serve
Per 1/20 of recipe:
67 calories | 5.6g sugar | 2.6g fat

Almond Biscotti


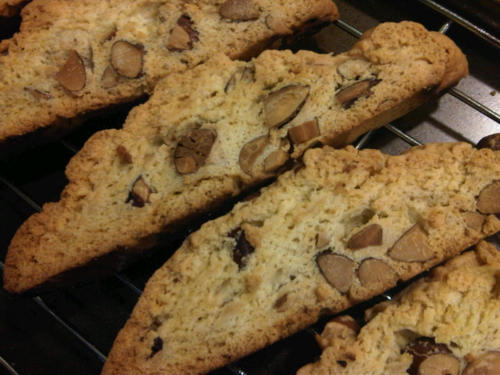
Looking at biscotti, you would never be able to tell how it’s made. And until recently, I just accepted the fact that it was a treat only to be enjoyed at fancy coffee shops, unreachable to us mere mortals who gladly shell out a few bucks for the crispy Italian cookie. Even after reading through recipes for it, the prospect of making biscotti still seemed daunting, I mean, anything that requires 3 trips into the oven must be difficult to make. But with the encouragement from my workout buddy MC, I was up for the challenge.

 
Though MC suggested a delicious sounding chocolate-walnut version, I was fearing that I was in danger of surpassing my family’s taste for chocolate treats. There can be too much of a good thing. Instead, I chose a classic, simple, unadulterated almond type from allrecipes (of course) (the original). I halved the recipe and ended up with 40 biscotti, just the right amount for Christmas dinner dessert and other guests we have passing by this week.
 
MC was right, it really wasn’t that difficult at all  to make. I wasn’t sure how much 4oz of almonds would be in terms of cups and spoons so I just added in a cup. The biscotti were a bit on the almond-y side, so 3/4 cup of almonds should suffice next time. I also didn’t have any anise extract but they still tasted delicious. I only had medium eggs on hand so I replaced the prescribed 3 large with 4 medium. And for some reason, we were either out of baking powder (or I just couldn’t find it), so I replaced it with 1/2 teaspoon of baking soda (the internet told me that’s what I should do).
The almonds we had at home were raw, which means I had to roast them myself. This was pretty easy as I looked up some instructions online. I spread them out on a cookie sheet, sprayed them with a bit of cooking spray and stuck them in the oven (which was already preset to 350F) until they smelled…roasted?  In hindsight, I probably over-roasted them a bit. But they weren’t burnt so that’s ok.
Since I couldn’t fit all the biscotti onto a single cookie sheet, I had to place the two cookie sheets on the upper and lower rack of the oven. This resulted in the bottoms of one batch burning a bit while they were toasting (oven trip #2), so I’ll be sure to alternate them more frequently next time.
I also melted a few white chocolate moulding wafers (little disks of chocolate) and drizzled the tops of some of them, which looked quite nice. Everyone who’s tried them so far say that they taste just like the real thing, so all in all, I’d say this was a pretty successful first attempt at biscotti.
 
Almond Biscotti
Yield: 40 Biscotti
  • 1/3 cup + a bit (i.e. Half of 3/4 cup) butter
  • 3/4 cup white sugar
  • 4 medium (or 3 large) eggs
  • 1 teaspoon anise extract (I didn’t put any but I’m sure it wouldn’t hurt)
  • 1 teaspoon vanilla extract
  • 3 cups all-purpose flour
  • 1/4 teaspoon salt
  • 1 teaspoon baking powder (I used 1/2 tsp baking soda)
  • 3/4 cup chopped roasted almonds (or whatever 4oz is)
  • 20 white chocolate moulding wafers (optional)
  1. Preheat oven to 350 degrees F
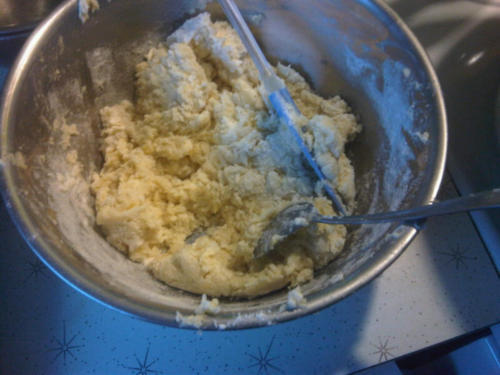
  2. In a large bowl, cream the butter and sugar together. Add eggs one at a time; beat until fluffy. Stir in the anise and vanilla extracts. Sift together the flour, baking powder, and salt; Add them to the egg mixture along with the chopped almonds. Stir with a spoon and as the dough comes together, Knead by hand.
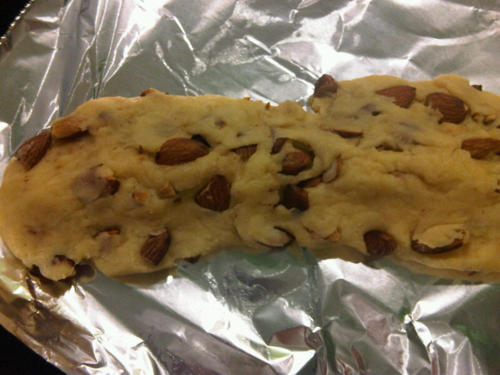
  3. Divide the dough into 2 parts. Roll each piece into a log about 15 inches long. Place logs onto cookie sheets, 2 to a sheet, the long way. Flatten the logs out until they are about 3 inches wide with a slight hump going down the middle. Bake for 25 to 30 minutes in the preheated oven, loaves should be firm. Cut the loaves into diagonal slices 1/2 inch wide, place the slices onto the cookie sheets and return to the oven. Toast on one side, then turn them over to do the other side. This will take about 7 to 10 minutes.
  4. Allow to cool completely
  5. Melt chocolate in a small ziploc bag in the microwave ~20-30 seconds, snip off corner and drizzle over biscotti
Almond roasting instructions, if needed
  1. Spread almonds onto a cookie sheet in a single layer
  2. Lightly spray with cookie spray
  3. Bake in 350F oven for ~5 minutes (until the ‘look’ and smell roasted)
  4. Allow to cool slightly and chop
Per cookie (without drizzle):
80 calories | 3.75g sugar | 3.5g fat

LinkWithin

Related Posts Plugin for WordPress, Blogger...

Total Pageviews